2. Add Gift Message Widget
Use this guide to install and customize the Giftnote gift message widget on your product pages, cart page, and cart drawer. You can install it via the Shopify Theme Editor or manually with a snippet.
Written By Giftnote Team
Last updated About 10 hours ago
Heads up — Giftnote v3 is here and the app looks different. We have just launched a completely new interface, so some screenshots and menu names in this article are still from the old version. We are updating the help docs over the next few days. In the meantime, if you get stuck, email support@giftnote.com and we will help you out.
1. Add the Widget to a Product Page (Online Store 2.0)
Using the Theme Editor (Recommended)
Go to Online Store > Themes > Customize
Open any Product Page
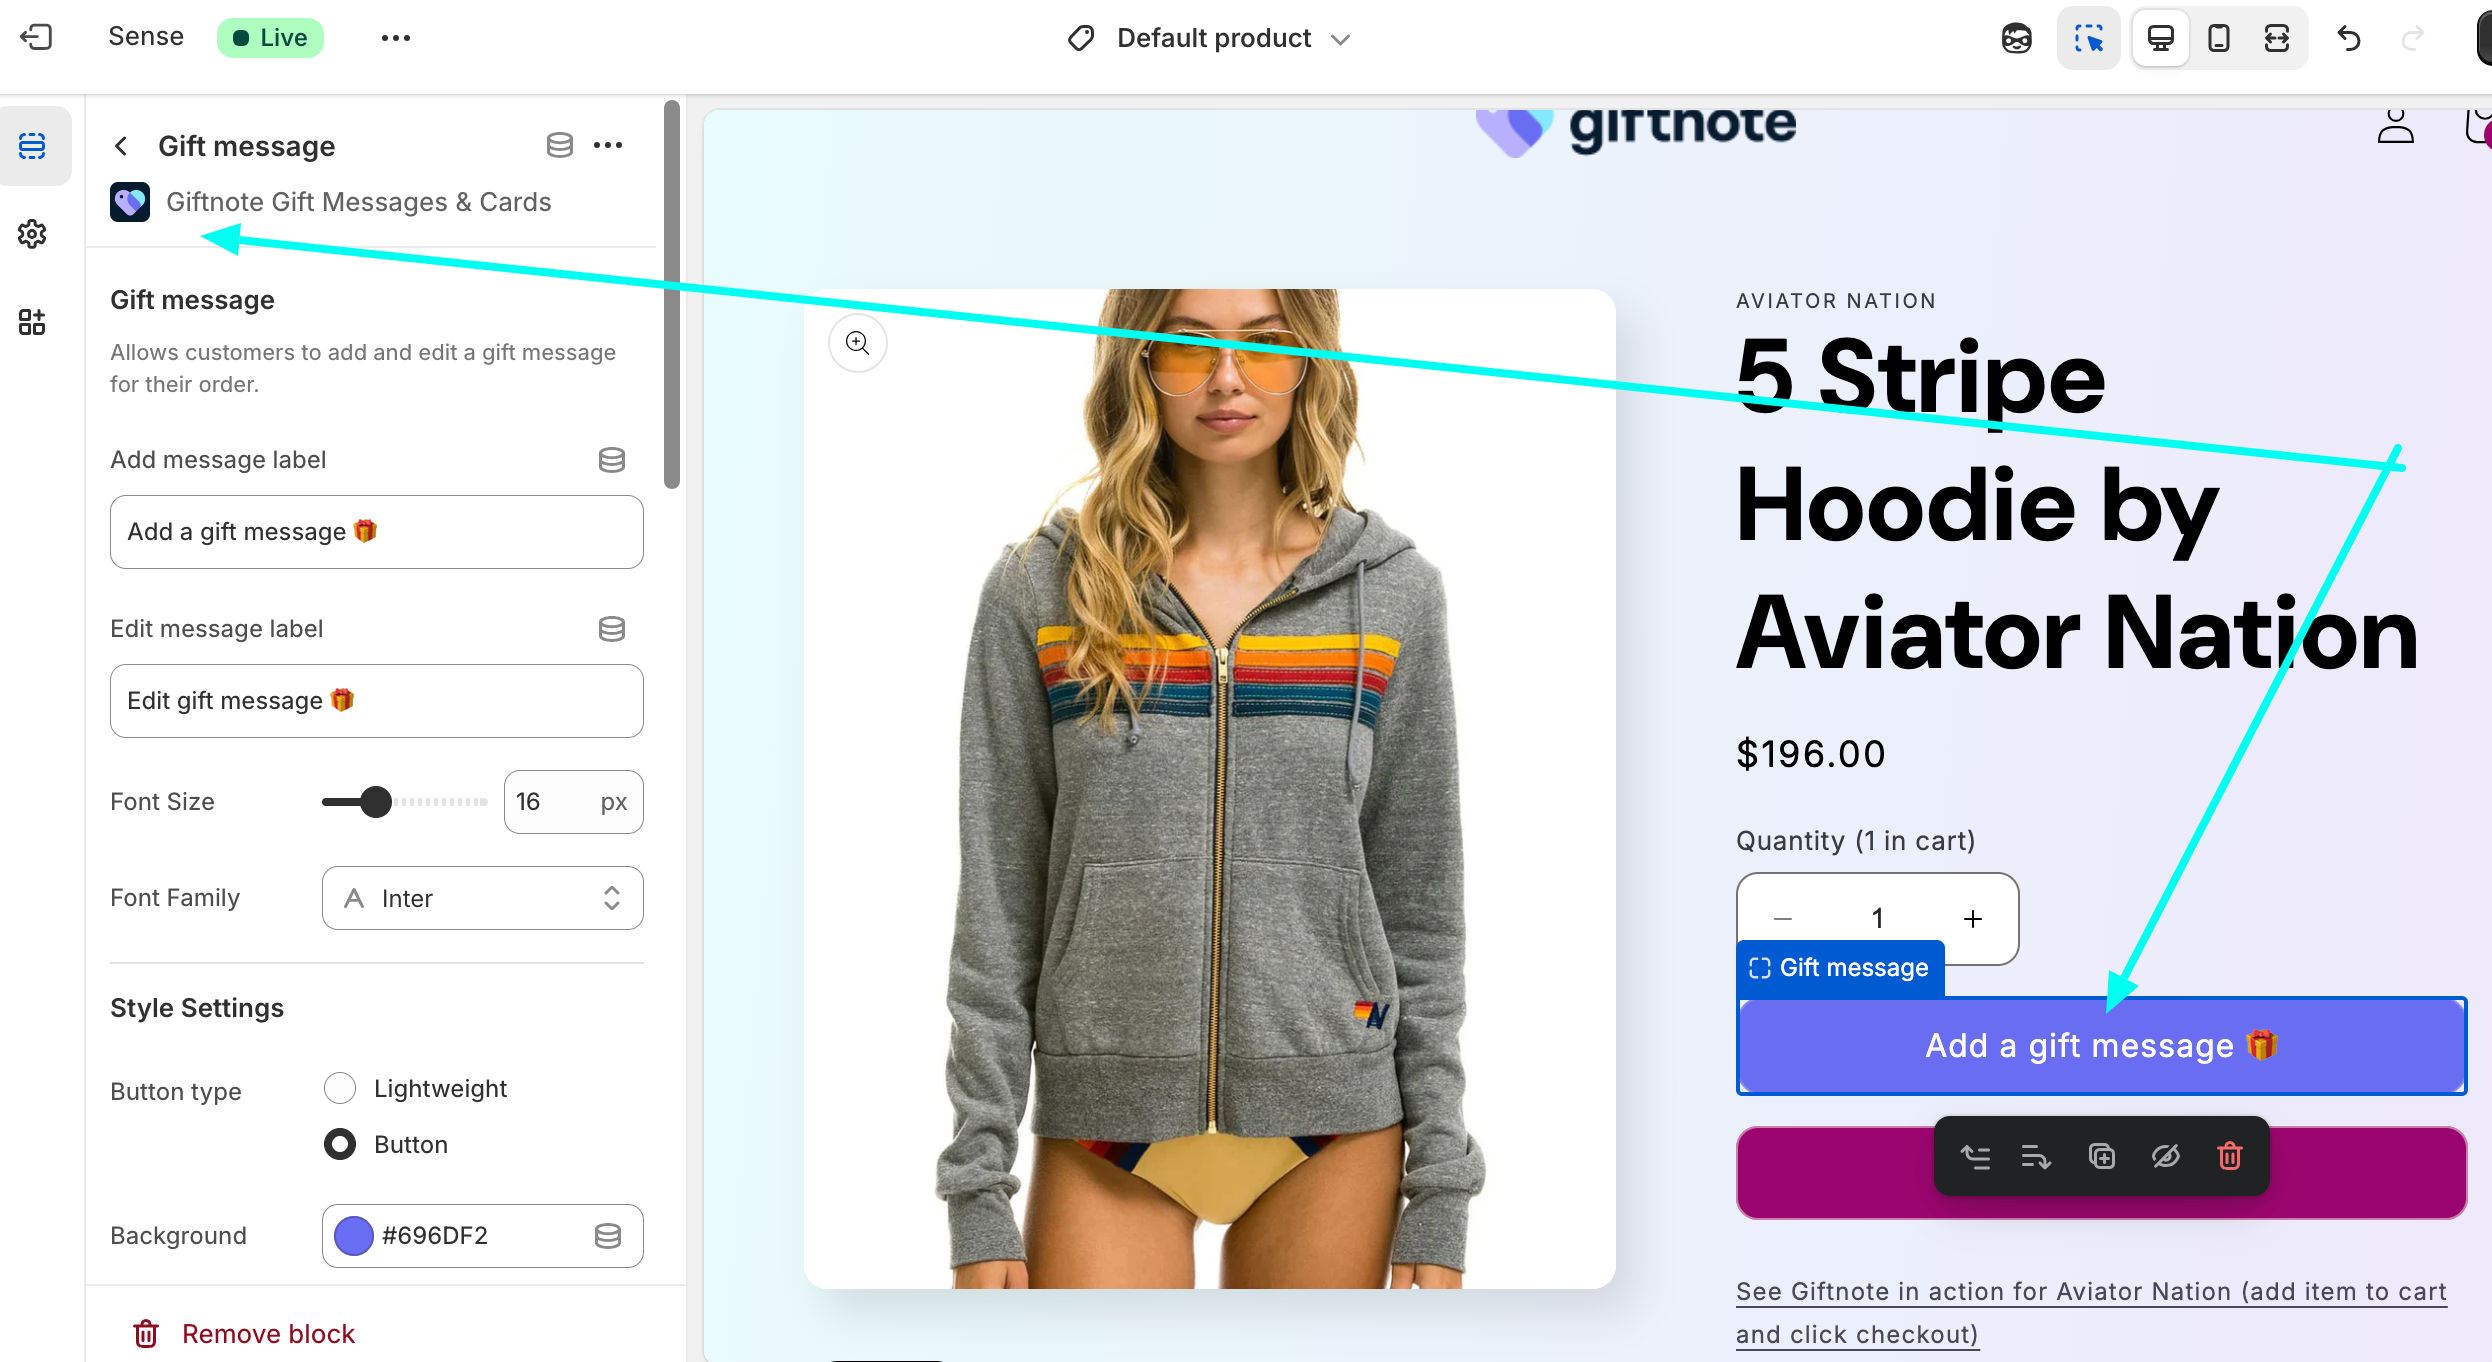
Click “Add Block” under Product Information
Select “Gift Message” by Giftnote
The button will appear on the page
Click the block to update:
Button text
Font and colors
Add custom CSS if needed
Exclude Widget on Certain Products
Use the Exclusion Tag setting
Add this tag to any product in Shopify where you don’t want the widget to appear
Using a Manual Snippet (Legacy Themes)
If your theme doesn’t support Theme Editor blocks, paste the following into your product.liquid file:
<template id="__NAME_OF_BUTTON__"> <style> /* ADD CSS HERE */ </style> </template> <giftnote-button data-styles="__NAME_OF_BUTTON__" data-add="Add a gift message" data-edit="Edit gift message" ></giftnote-button> Need help? Email support@giftnote.com
2. Enable the Popup: App Embed
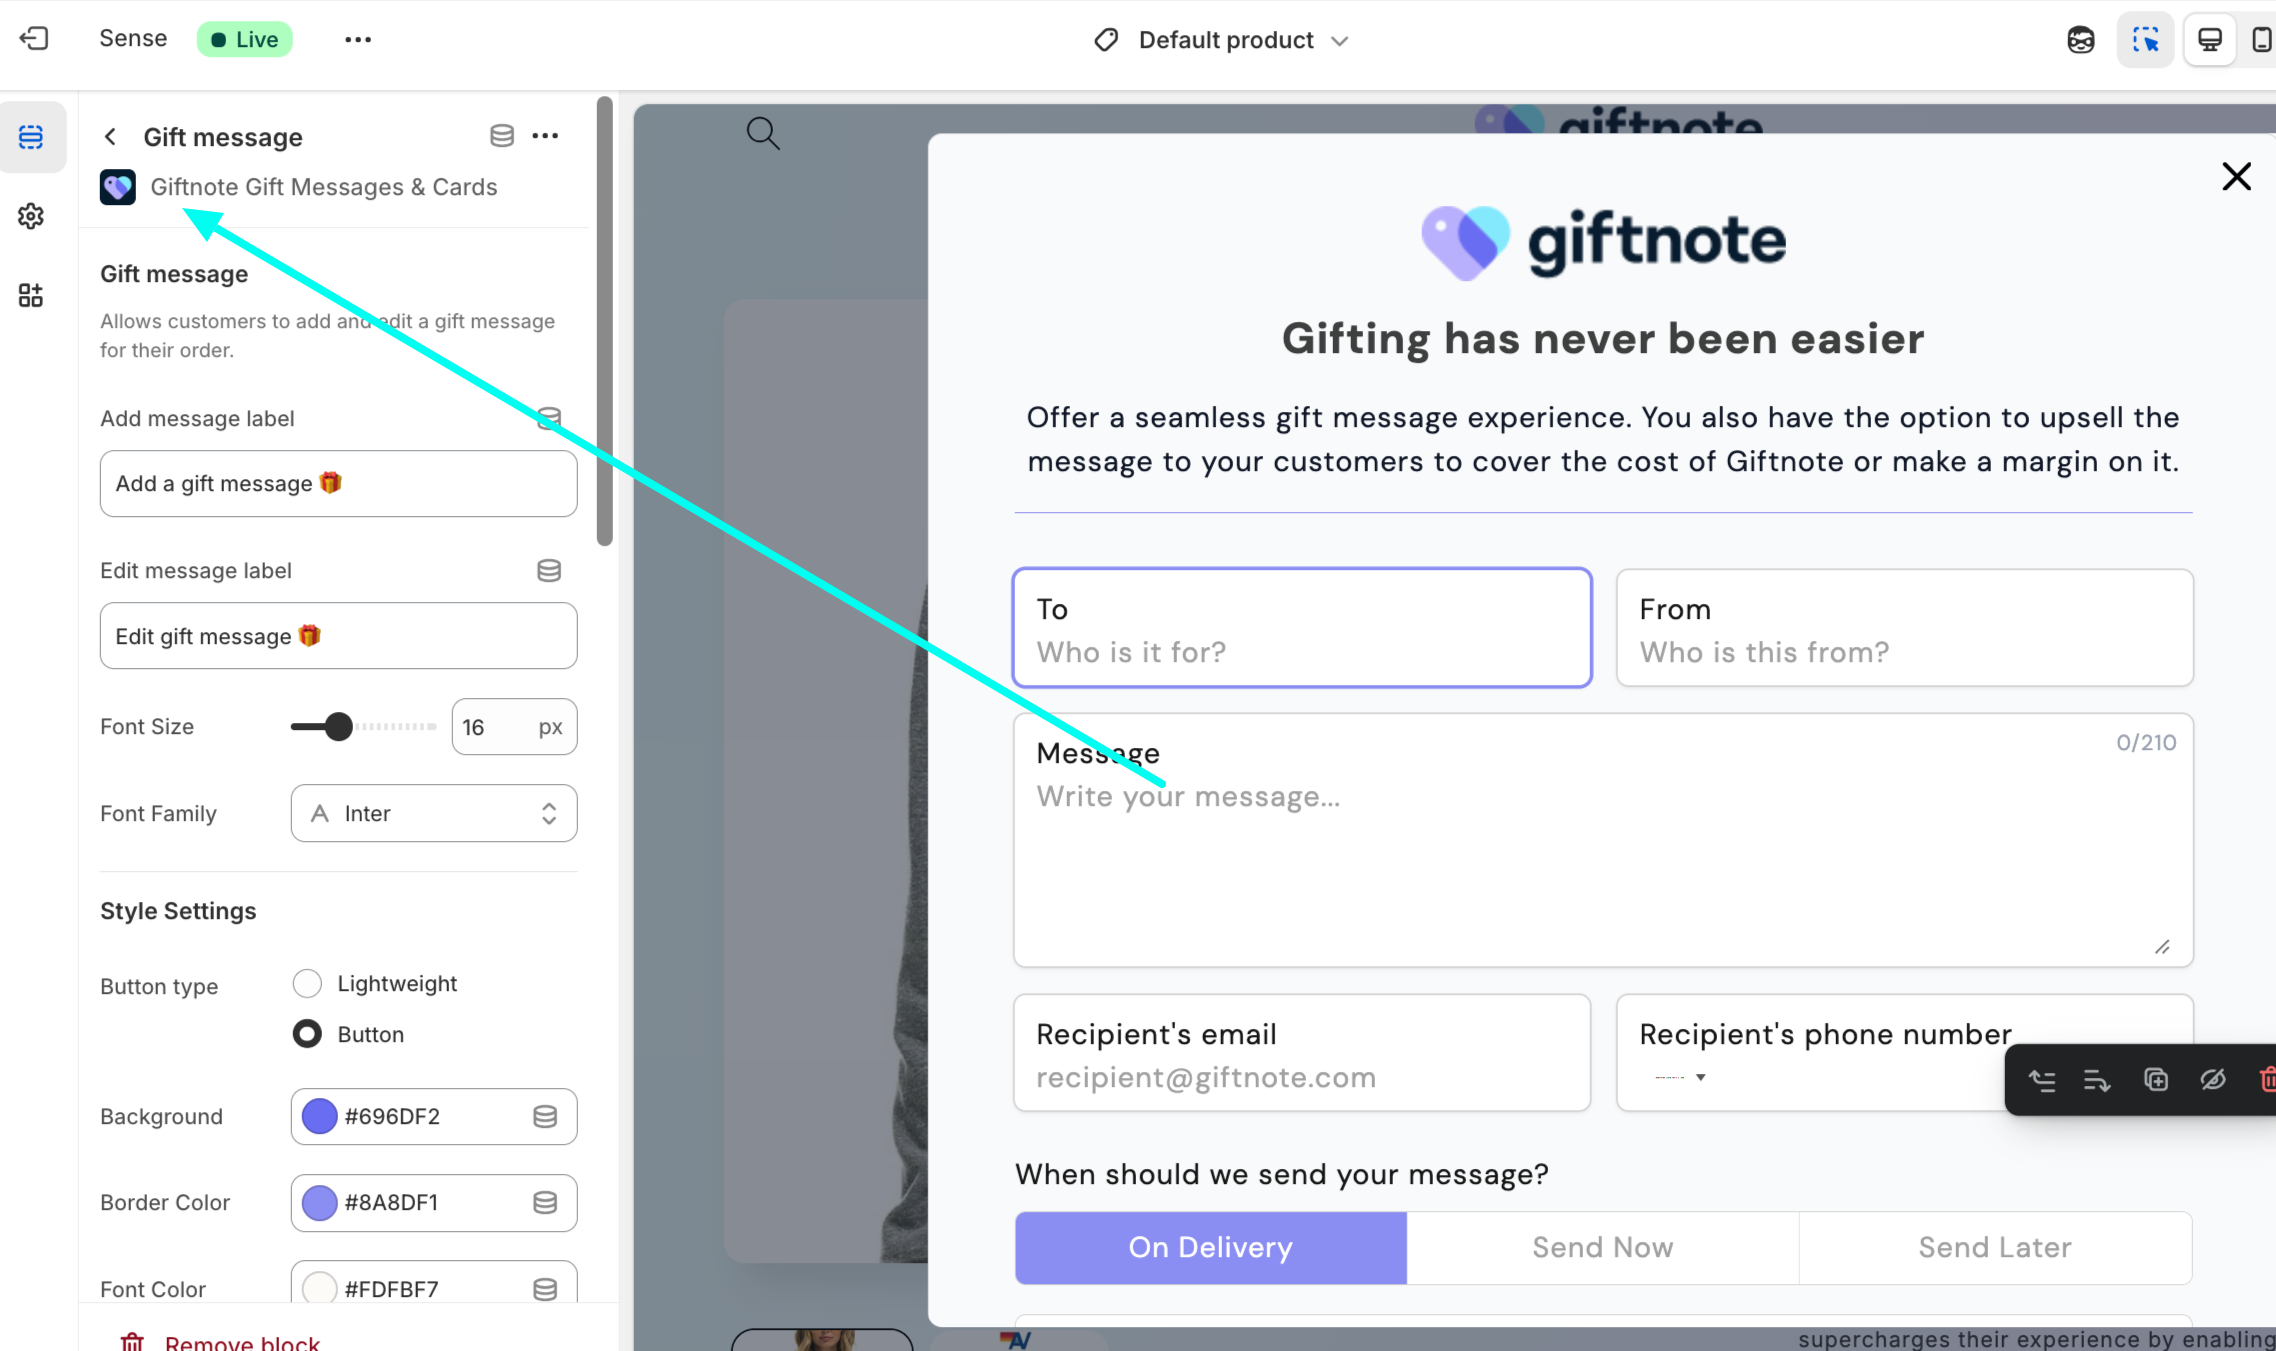
In your Theme Editor, go to App Embeds
Toggle on “Giftnote Control Panel”
Click Save
This enables the popup to collect the gift message when the button is clicked.
Style the pop-up to match your brand
Click Giftnote Control Panel in App Embeds to open its settings. The Modal Styling (CSS) field lets you change the pop-up's fonts, colours, borders and buttons.
You don't need to write the CSS yourself. Copy the prompt below into ChatGPT, Claude or another AI assistant, fill in the brackets, then paste the CSS it gives you into Modal Styling (CSS) and click Save.
I use the Giftnote gift message app on my Shopify store. Write custom CSS for the Giftnote gift message pop-up so it matches my brand. I'll paste it into the "Modal Styling (CSS)" field in the Giftnote app embed settings.

My store: [your store URL]

If you can browse the web, visit my store and match its fonts, colours, button style and corner rounding. Otherwise, use these:
- Heading font: [e.g. Playfair Display]
- Body font: [e.g. Poppins]
- Pop-up background colour: [e.g. #FFFFFF]
- Main text colour: [e.g. #111111]
- Button colour and button text colour: [e.g. #F97443 with #111111 text]
- Corner style: [square / slightly rounded / pill-shaped buttons]

How the pop-up is built:
- The pop-up card is #content. The outer wrapper is #giftnote-modal and the dimmed background behind it is #backdrop.
- Heading: #giftnote-modal-title. Intro text: #giftnote-modal-description.
- Input boxes: #to-field, #from-field, #message-field, #email-field, #phone-field, #date-field, #time-field. The text inside them is #content form input, #content form textarea and #content form select. Labels are #content form label.
- The delivery timing tabs are #method button. The selected tab has the class .active.
- The info box under the tabs is #methods.
- The save button is #save-button. Its text colour is set by #content .button-color.
- The close button is #close-button.

Rules:
- Only target the IDs above. Don't target utility classes such as .bg-white or .text-sm, because they can change when Giftnote updates.
- Add !important to every declaration, otherwise the pop-up's built-in styles will win.
- The input boxes draw their outline with box-shadow, not border. Style them with box-shadow: inset 0 0 0 1px [colour] and use :focus-within for the focused state.
- Only use fonts my store already loads. Don't add @import or font links.
- Keep all text readable against its background (WCAG AA contrast).
- Don't hide or restyle the "Powered by Giftnote" link.

Return one complete CSS block with short comments. After it, suggest a heading, intro line and save button label for the pop-up in my brand's voice.
Tips
Paste the whole CSS block every time you make a change, and keep a copy outside Shopify.
Check the result in a private browser window, because theme settings can be cached.
Update the pop-up wording in the Giftnote app (see step 3), not with CSS.
For more detail, see Customising your gift message widget.
3. Customize the Popup in the Giftnote App
In the Control Panel inside the Giftnote app, you can customize:
Message copy
Logo and branding
Colors
Enable/disable delivery method (email, SMS, on delivery or ahead of time)
4. Add the Widget to the Cart Page
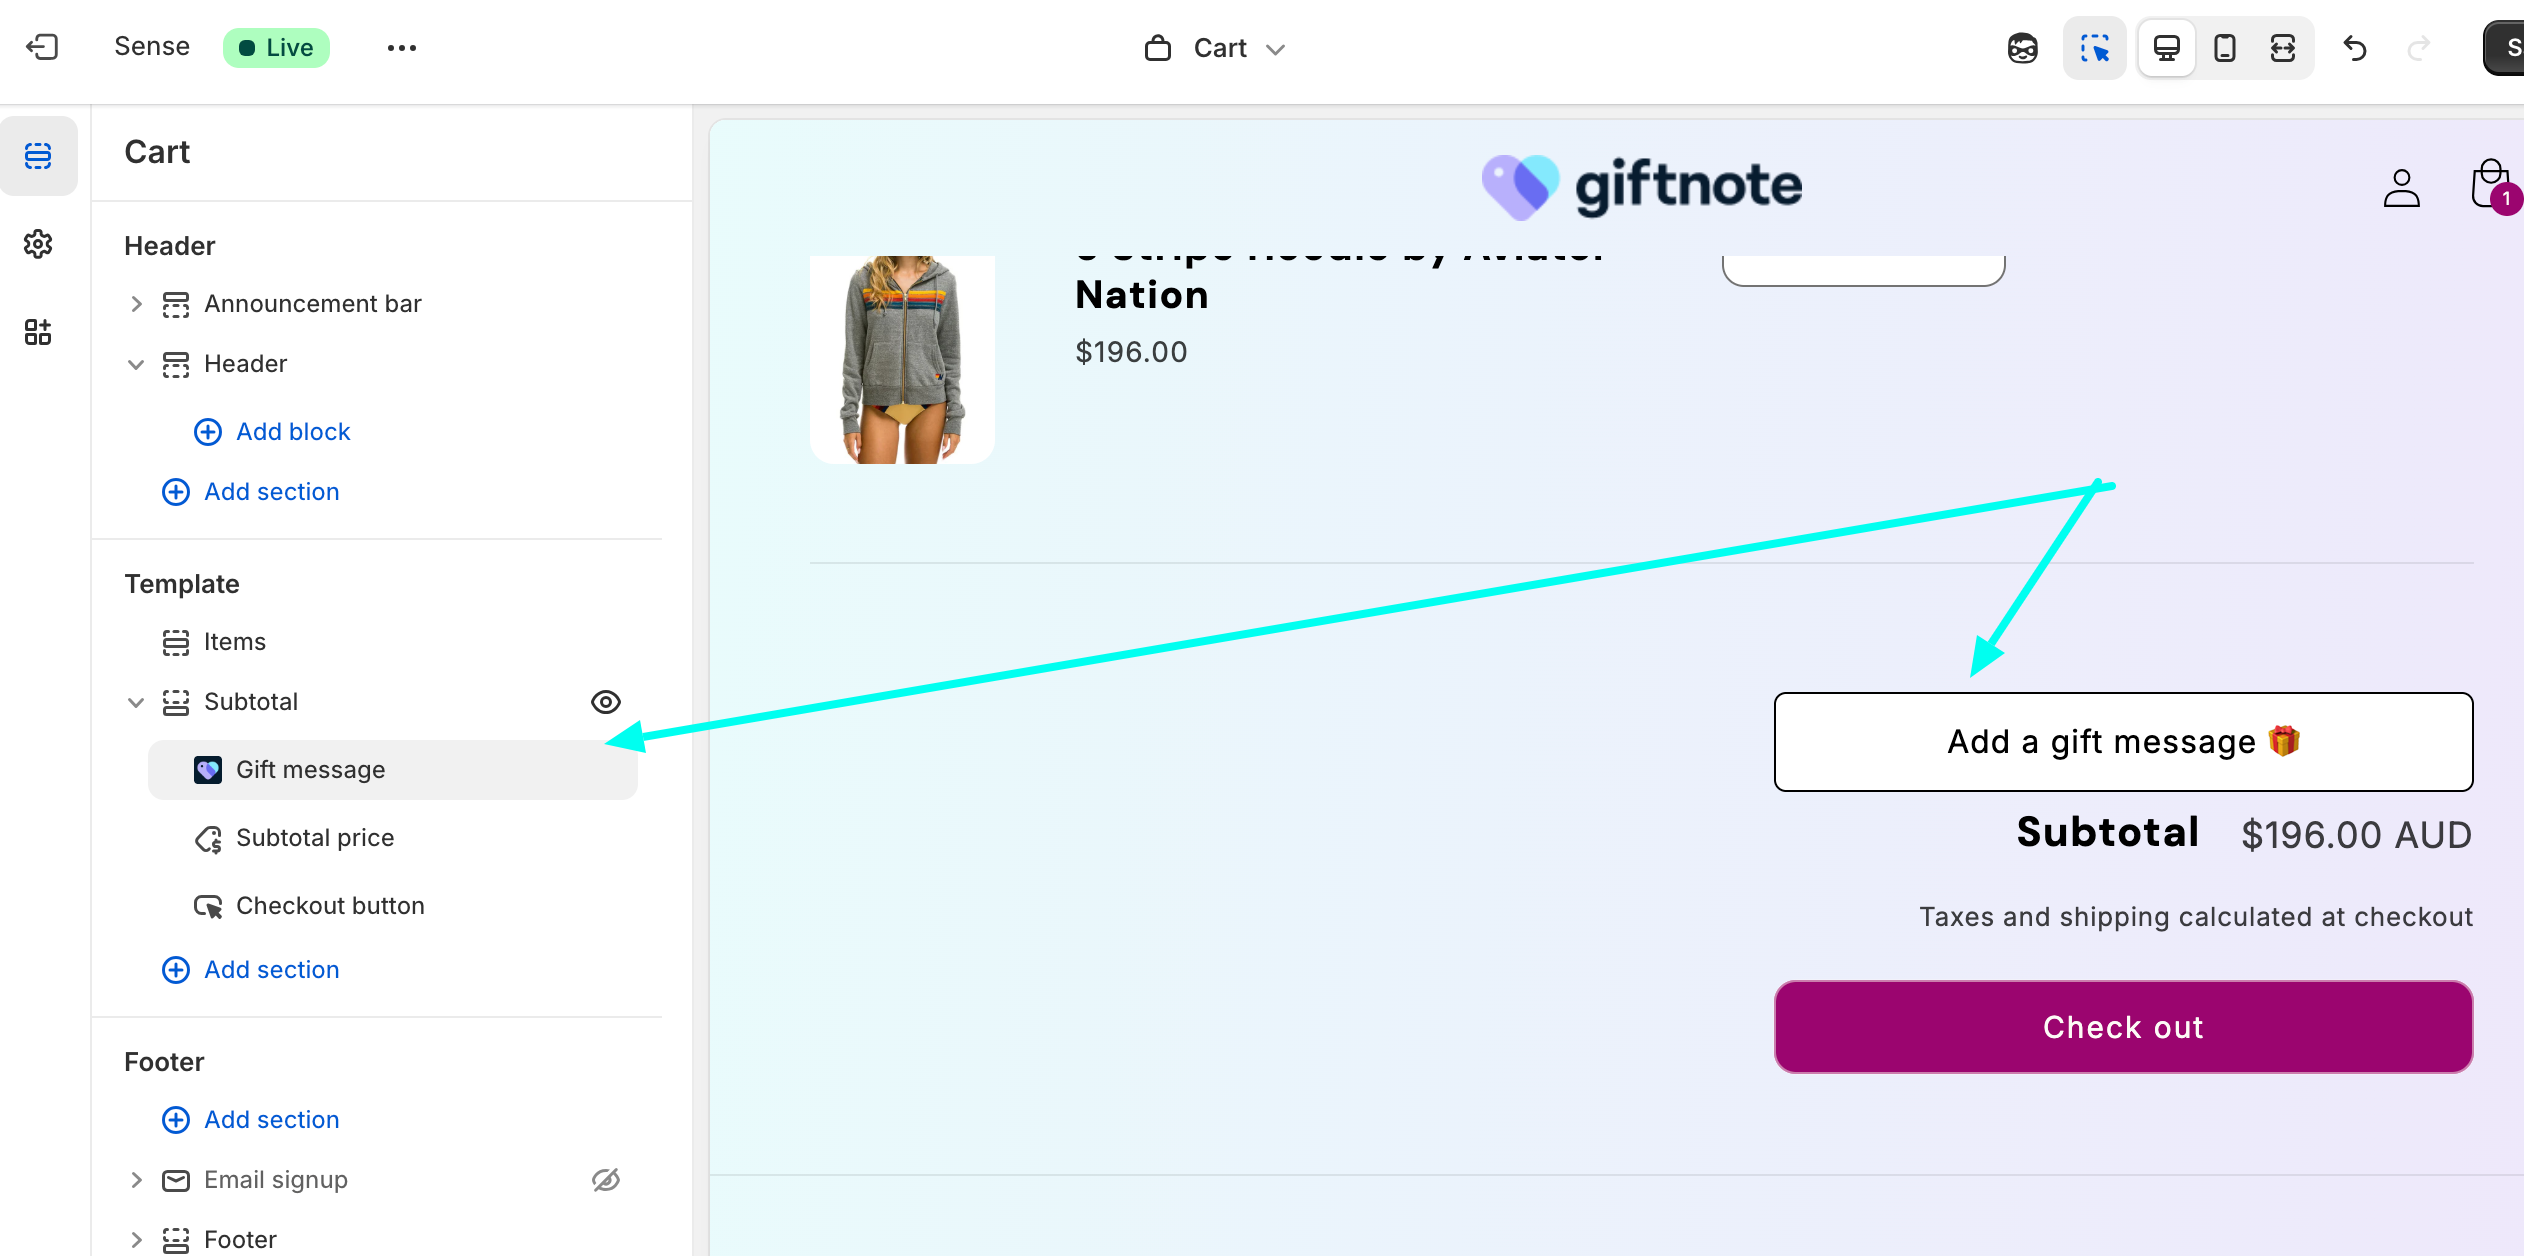
Via Theme Editor
If your theme supports it:
Navigate to your Cart Page in Theme Editor
Follow the same steps as for the Product Page
Using a Manual Snippet
If Theme Editor doesn’t support block placement:
<template id="__NAME_OF_BUTTON__"> <style> /* ADD CSS HERE */ </style> </template> <giftnote-button data-styles="__NAME_OF_BUTTON__" data-add="Add a gift message" data-edit="Edit gift message" ></giftnote-button> 5. Add to Cart Drawer
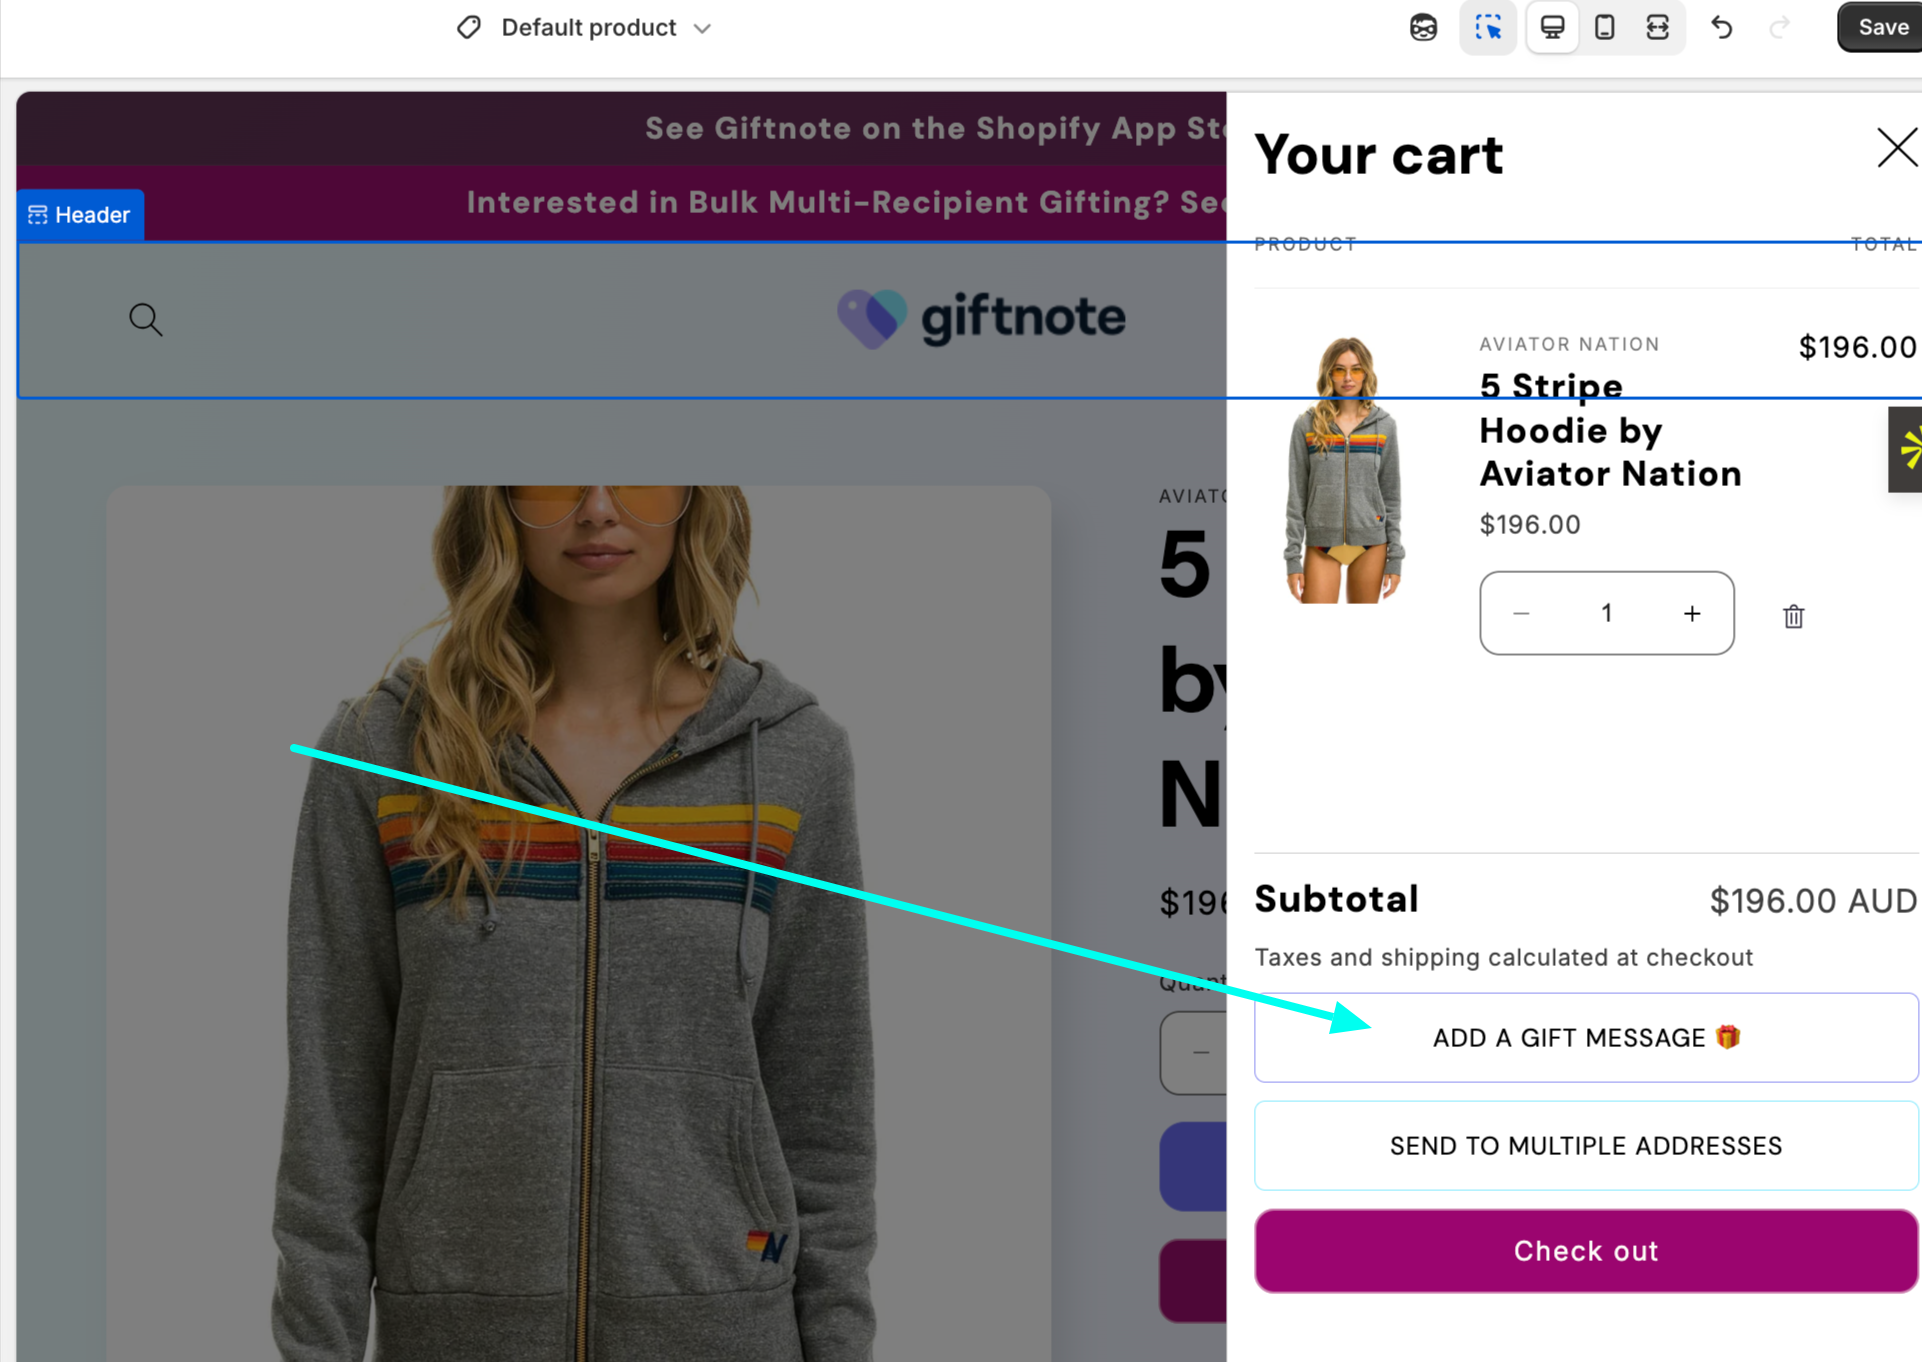
Most themes and apps (e.g. Rebuy) require a manual install:
Add the snippet below into your
cart-drawer.liquidor equivalent
<template id="__NAME_OF_BUTTON__"> <style> /* ADD CSS HERE */ </style> </template> <giftnote-button data-styles="__NAME_OF_BUTTON__" data-add="Add a gift message" data-edit="Edit gift message" ></giftnote-button> Contact support@giftnote.com if you need help targeting the right location
Troubleshooting
If the widget:
Doesn’t appear
Conflicts with another app
Has styling issues
Doesn’t open the popup
Reach out to support@giftnote.com with your theme name and store URL. We'll jump in and help you fix it quickly.