7. Giftnote Go-Live Checklist
A checklist to run before launch: app embed, widget, notifications, gift card product, delivery tracking and a real test order.
Written By Giftnote Team
Last updated 15 days ago
Run through this list before customers start using Giftnote. Tick each item, then place a real test order. Each item is explained under Full details further down. This is the Place a test order step of the Setup guide on the Giftnote Home page.
Storefront
- The Giftnote app embed (Giftnote Control Panel) is enabled in the theme you are launching
- Gift message widget is visible on your storefront (product page, cart, and/or checkout)
- The gift message option shows when you check out with Shop Pay (Shopify Plus only)
Notifications
- Klaviyo flows are approved as transactional (if using Klaviyo)
- Native Giftnote emails are disabled (if using Klaviyo)
- SMS template is reviewed and customized
Gift card product (skip if you don't sell gift cards)
- Gift card product created from scratch in Shopify (not converted from an existing product)
- Track inventory is unchecked on every variant
- This is a physical product is unchecked on every variant
- Old or native Shopify gift card product is unpublished
- Only one Giftnote gift card product is live
- The product shows
Active, with the vendor Giftnote Gift Card, in Settings → Gift Cards → Products
Delivery tracking
- Your orders carry a carrier name and tracking number in Shopify
- If your carrier doesn't report deliveries, you have chosen what to do instead (On Fulfillment, or hide On Delivery)
Test orders
- Test order placed from your live storefront (not from Shopify admin)
- Gift message appears in Gift Orders in the Giftnote app
- Test order marked as Delivered in Shopify admin
- Recipient received the gift notification (email and/or SMS)
Full details
Enable the Giftnote app embed in your theme
The Giftnote app embed switches Giftnote on for your store. Without it, nothing shows, even if you've added the widget block to your theme.
- Open your themes. In your Shopify admin, go to Online Store → Themes.
- Customize the theme. Click Customize on the theme you are launching. We suggest turning Giftnote on in an unpublished copy of your theme first, then publishing it.
- Open App embeds. Click the App embeds icon in the left sidebar (it looks like a puzzle piece).
- Turn on Giftnote. Find Giftnote Control Panel in the list and toggle it on.
- Save. Click Save in the top-right corner of the theme editor.
Important: you switch app embeds on separately in each theme. If you publish a different theme later, turn the Giftnote app embed on in that theme too.
If you don't see Giftnote in the App embeds list, the app may not be fully installed. Go to Apps in your Shopify admin, open Giftnote, and confirm the installation is complete.
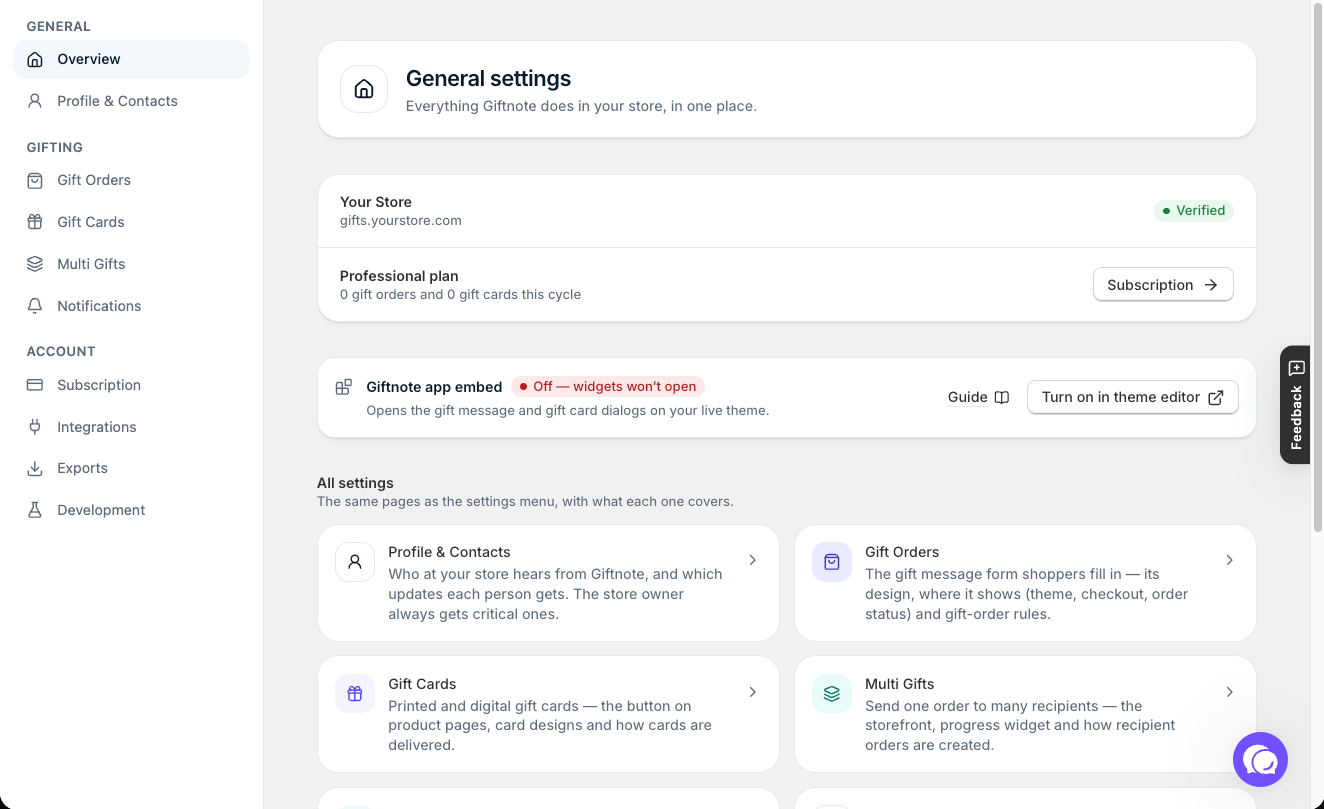
Check it from the Giftnote app. Go to Settings → Overview. The Giftnote app embed card should show the embed is on. If it says Off, gifting won't show in your store: click Turn on in theme editor and turn the embed on. Each widget shows its own status (Detected or Not detected) on its Gifting page, for example Settings → Gift Orders. These statuses only check your published theme, so changes in an unpublished copy show up once you publish it.
Confirm the gift message widget is visible on your storefront
Check the widget shows where your customers will see it.
- Open your store. Use your public storefront URL in a new browser tab, not the Shopify admin preview. If you are still on an unpublished theme, use that theme's preview.
- Check a product page. Look for the gift message button (for example "Send as a Gift", or your own button text).
- Check the cart. Add a product to your cart and open your cart drawer or cart page. Confirm the widget appears there too, if you've added it to the cart.
- Check checkout. Proceed to checkout and confirm the widget appears (Shopify Plus only).
If the button is missing on one product page, that product may use a different template without the Giftnote block. Go back to the theme editor and add the block to that product's template. Also check the product isn't listed under Hidden products in Settings → Gift Orders → Settings, or tagged with the block's exclusion tag.
What to check for:
- Button text, colour and placement look right
- Clicking the button opens the gift message popup
- The popup lets you enter a recipient name, email or phone, and a gift message
If the widget shows on desktop but not mobile (or the other way round), your theme's styling is usually clashing with it. Chat with us using the chat button in the help centre or in the app, or email support@giftnote.com, with your store URL and a screenshot of what you see.
Check the gift message option in Shop Pay (Shopify Plus only)
If the gift message block isn't included in Shop Pay, customers who pay with Shop Pay won't see the gift message option at checkout. In the checkout editor, select the Gift Message block and check Checkout behavior → Include block in Shop Pay is on.
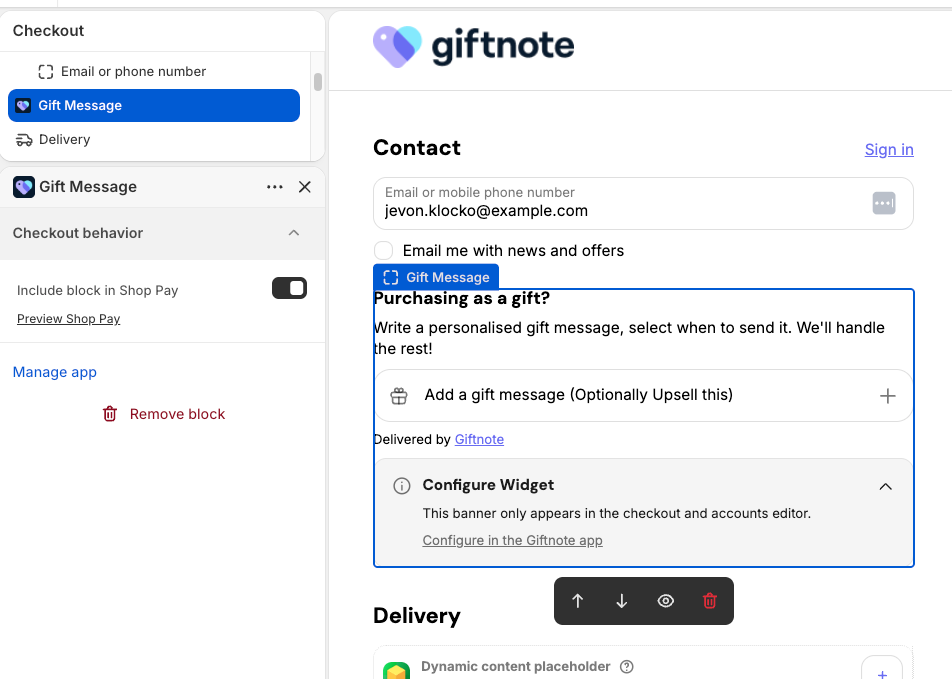
- Confirm the block is in your checkout. In your Shopify admin, go to Settings → Checkout and click Customize. Use the Giftnote Gift Message block. Don't use the entry labelled [DEPRECATED] Gift Message.
- Start a checkout with Shop Pay. On your storefront, add a product to your cart and choose Shop Pay.
- Look for the gift message option. Confirm it shows in the Shop Pay checkout, as it does in your standard checkout.
If the option doesn't show in Shop Pay, go back to the checkout editor, select the Gift Message block and turn on Include block in Shop Pay, then save and test again.
No Giftnote checkout block at all? The checkout block only works on Shopify Plus. On other Shopify plans, use the product page and cart widgets instead.
Verify Klaviyo flows are approved as transactional (if using Klaviyo)
Klaviyo has to approve your Giftnote flows (automated emails) as transactional before they'll reach gift recipients. Transactional means Klaviyo treats them as service messages, like a receipt. Without that approval, Klaviyo only emails people who have opted into marketing, and almost no gift recipients have.
- Open your flows. In your Klaviyo account, go to Flows.
- Find each Giftnote flow. Giftnote events start them, such as
Received Gift Orderfor gift messages andReceived Gift Cardfor gift cards. If you connected Klaviyo before the September 2026 update, flows built on the old metric names keep working. - Check the status. Click into each flow. It should show Live and Transactional.
If a flow shows Live but not Transactional, Klaviyo hasn't approved it yet. Approval can take up to 24 hours, so ask for it at least one day before you plan to go live.
What gets a flow rejected by Klaviyo: buttons that push a sale, promotional images, discount codes or split tests. Transactional flows have to be informational only. If Klaviyo rejects a flow, remove those parts and resubmit through Klaviyo's live chat.
Important: if you edit an approved Klaviyo template, you have to resubmit it, and it stops being transactional until Klaviyo approves it again. Don't edit approved templates just before go-live or during your busiest gifting weeks.
Disable native Giftnote emails (if using Klaviyo)
If your Klaviyo flows are live and Giftnote's built-in emails are still on, recipients get two emails for every gift. Turn off Giftnote's emails as soon as your Klaviyo flows go live.
- Open Notifications. In the Giftnote app, go to Settings → Notifications.
- Turn off the email channel. Open each event you've replaced with a Klaviyo flow and switch off its email channel.
Can't find Notifications? Look under Settings inside the Giftnote app, not in Shopify's own notification settings.
Note: Giftnote sends SMS itself, not through Klaviyo, so your SMS keep sending even when Klaviyo handles your emails.
Review your SMS template
Giftnote sends gift SMS directly, not through Klaviyo or any other tool.
- Open Notifications. In the Giftnote app, go to Settings → Notifications.
- Find the SMS events. Gift Order - Gift Message Delivered and Gift Card - Delivered to Recipient are the main SMS events. Gift Card - Store Credit Issued, Gift Card - Generic and Multi Gift - Claim Request also have an SMS channel.
- Review the text. Open each one and edit the SMS wording if you want to.
- Save your changes.
Gift messages can be up to 210 characters.
Set up your gift card product correctly (if selling gift cards)
A wrongly set-up gift card product is the most common reason gift cards don't arrive. If any of these settings are wrong, gift cards can fail without any error or warning to you or the customer.
Check each setting on your Giftnote gift card product:
Check the result in Giftnote. Go to Settings → Gift Cards → Products. The top of the list shows how many products need fixing, and each product has Edit to fix it. A product with the vendor Shopify is a Shopify gift card and can't become a Giftnote gift card. A product that needs fixing won't issue gift cards properly.
Discounts on gift card purchases. Check Issue the full value when a discount is used in Settings → Gift Cards → Settings before you go live. While it's off, a gift card bought with a discount is issued for what the customer paid, not its full value.
If you previously used Rise.ai, Govalo or another gift card provider, make sure those products are unpublished and those apps are deactivated before going live with Giftnote gift cards. If two gift card apps run at once, customers can get duplicate cards and see two widgets.
On Delivery messages and tracking
On Delivery messages go out when the carrier marks the parcel as delivered. Giftnote works out the carrier on each order for you, so there's nothing to set up. (If you used Giftnote before the September 2026 update, you no longer map carriers by hand. Older orders keep their saved carrier mapping.)
Make sure tracking reaches Shopify. On Delivery messages need a carrier name and tracking number on the Shopify order. Your 3PL or a tool like ShipStation usually adds them. If you fulfil orders yourself, enter them yourself. Each gift order's page in Giftnote shows its fulfillment status.
If your carrier doesn't report deliveries (some local same-day couriers and newer fulfilment networks don't), you have three options:
- Mark the order Delivered in Shopify. Giftnote picks up Shopify's own delivered status too.
- Turn on On Fulfillment in Settings → Gift Orders → Settings → Delivery methods. It sends the gift message when the order ships, without waiting for delivery.
- Turn off On Delivery in Settings → Gift Orders → Settings → Delivery methods, so customers can't pick it.
If On Delivery messages keep failing for one carrier, chat with us using the chat button in the help centre or in the app.
Place a test order from your live storefront
This is the most important check. Only an order placed on your storefront tests the whole gift message journey. Orders you create in Shopify admin skip the gift message widget, so they won't show in Giftnote.
- Open your store. Use your public storefront URL in a browser, not the Shopify admin.
- Add a product to your cart.
- Add gift details. Click the gift message button and fill in the gift details. Use your own email and phone number as the recipient.
- Complete checkout and pay. Use a real payment method on a low-value product, then refund it afterwards. A 100% discount code can skip payment and make the test fail.
- Find the order. In your Shopify admin, go to Orders and find your test order.
- Mark it delivered. Click Mark as fulfilled, then update the tracking status to Delivered.
- Check your inbox and phone. You should receive the gift notification within a few minutes.
- Check Giftnote. Open Gift Orders in the Giftnote app (it also shows under Recent Orders on Home) and confirm the order appears with the correct status.
If the gift message doesn't appear in Giftnote, check you ordered on the storefront (not in Shopify admin) and that the Giftnote app embed is on in the theme you ordered from.
For complex setups, run a test order for each delivery method you offer:
Notes
You're ready to go live when all three of these are true:
- The gift message widget is visible on your production store (not just an unpublished theme)
- A real gift order has been received and appears in Giftnote
- The correct notification was delivered to the recipient (via Klaviyo or native Giftnote emails)
Timing:
- Klaviyo approval takes up to 24 hours, so ask at least one business day before go-live.
- Waiting on Klaviyo email designs is the most common launch delay. If you need to launch fast, go live with Giftnote's built-in emails and add Klaviyo afterwards.
After go-live:
- Check Gift Orders in the Giftnote app during the first week for any orders in an error state or showing Health warnings
- If you publish a new theme, turn the Giftnote app embed on in that theme
Prefer us to run through this list with you? Email support@giftnote.com to request a complimentary onboarding.
Related articles
Was this helpful?
Still need help? Share an idea