3. Add Gift Message Widget
Add the gift message widget to your product page, cart and cart drawer, turn on the Giftnote Control Panel app embed, and change its wording and style.
Written By Giftnote Team
Last updated 15 days ago
The gift message widget is the button your customers click to add a gift message, plus the pop-up where they type it. This article shows you how to add it to your product page, cart page and cart drawer, and how to change its wording and look. It covers the Turn on Giftnote and Add the gift widget to your product page steps of the Setup guide on the Giftnote Home page.
Before you start: switch on the Giftnote Control Panel app embed (section 2). Without it, the button shows but the pop-up won't open. If you can, work in an unpublished copy of your theme (Online Store > Themes, then Duplicate) so customers don't see anything until you're ready.
1. Add the widget to a product page (Online Store 2.0)
Using the theme editor (recommended)
- In Shopify, go to Online Store > Themes and click Customize to open the theme editor. Or, in Giftnote, go to Settings → Gift Orders and click Open in Shopify next to Product page.
- Open a product page in the theme editor
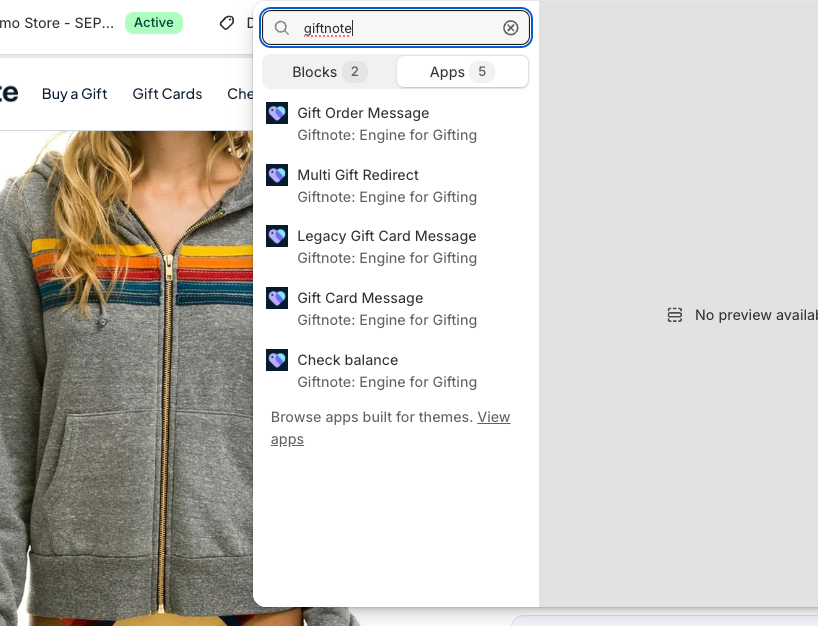
- Click Add block under Product Information, type giftnote in the search box and open the Apps tab
- Select Gift Order Message (Giftnote: Engine for Gifting). Don't pick Legacy Gift Card Message, which is an older gift card block.
- The gift message button appears on the page. Drag it where you want it and click Save.
- To change the button text, font or colors, click the block and edit its settings
Hide the widget on some products
- Type a tag into the block's Exclusion tags setting
- In Shopify, add the same tag to each product that shouldn't show the widget
Or pick the products in Giftnote under Settings → Gift Orders → Settings → Hidden products. See How do I hide the gift message widget on specific products?
Using a manual snippet (legacy themes)
Older themes don't support blocks. If you can't find the Apps tab in step 1, paste this snippet into your product.liquid file:
<template id="__NAME_OF_BUTTON__">
  <style> /* ADD CSS HERE */ </style>
</template>
<giftnote-button
  data-styles="__NAME_OF_BUTTON__"
  data-add="Add a gift message"
  data-edit="Edit gift message"
></giftnote-button>
Change __NAME_OF_BUTTON__ to any name you like, using the same name in both places. Add your own CSS inside the <style> tag. data-add and data-edit set the button text before and after a message is added. The Giftnote Control Panel app embed (section 2) must be on for the button to open the pop-up.
Not sure where to paste it? Copy this prompt into ChatGPT or Claude, fill in the brackets and paste in your theme file. It will tell you where the snippet goes:
I run a Shopify store on an older theme that doesn't support app blocks.
I need to add the Giftnote gift message button to my [product page / cart page / cart drawer].
Here is the snippet I need to add:
[paste the Giftnote snippet]
Here is my theme file ([product.liquid / cart.liquid / cart-drawer.liquid]):
[paste the file]
Tell me exactly where to paste the snippet so the button shows [just above the Add to cart button / below the cart items].
Don't change any other code. Return the full edited section with the snippet in place.
Duplicate your theme before editing code, so you can go back if something breaks. For help, chat with us using the chat button in the help centre or in the app, or email support@giftnote.com, with your theme name and store URL.
2. Enable the popup: app embed
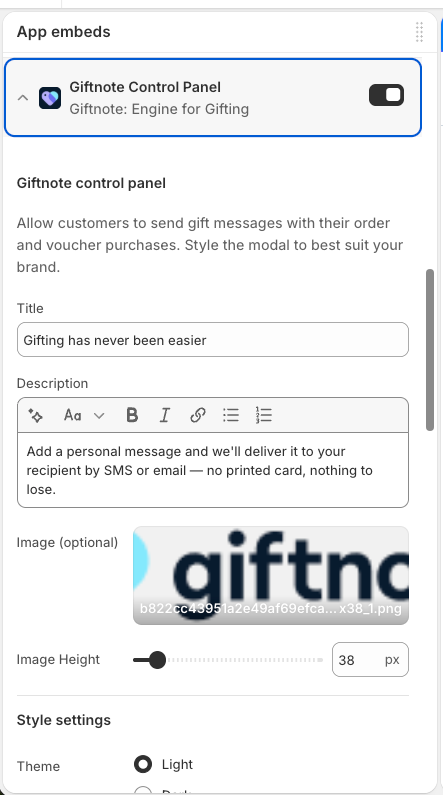
- In the theme editor, open App embeds
- Switch on Giftnote Control Panel and click Save
This turns on the pop-up where customers type their gift message after clicking the button.
Style the pop-up to match your brand
Click Giftnote Control Panel in App Embeds to open its settings. The Modal Styling (CSS) field lets you change the pop-up's fonts, colours, borders and buttons.
You don't need to write the CSS yourself. Copy the prompt below into ChatGPT, Claude or another AI assistant, fill in the brackets, then paste the CSS it gives you into Modal Styling (CSS) and click Save.
I use the Giftnote gift message app on my Shopify store. Write custom CSS for the Giftnote gift message pop-up so it matches my brand. I'll paste it into the "Modal Styling (CSS)" field in the Giftnote app embed settings.

My store: [your store URL]

If you can browse the web, visit my store and match its fonts, colours, button style and corner rounding. Otherwise, use these:
- Heading font: [e.g. Playfair Display]
- Body font: [e.g. Poppins]
- Pop-up background colour: [e.g. #FFFFFF]
- Main text colour: [e.g. #111111]
- Button colour and button text colour: [e.g. #F97443 with #111111 text]
- Corner style: [square / slightly rounded / pill-shaped buttons]

How the pop-up is built:
- The pop-up card is #content. The outer wrapper is #giftnote-modal and the dimmed background behind it is #backdrop.
- Heading: #giftnote-modal-title. Intro text: #giftnote-modal-description.
- Input boxes: #to-field, #from-field, #message-field, #email-field, #phone-field, #date-field, #time-field. The text inside them is #content form input, #content form textarea and #content form select. Labels are #content form label.
- The delivery timing tabs are #method button. The selected tab has the class .active.
- The info box under the tabs is #methods.
- The save button is #save-button. Its text colour is set by #content .button-color.
- The close button is #close-button.

Rules:
- Only target the IDs above. Don't target utility classes such as .bg-white or .text-sm, because they can change when Giftnote updates.
- Add !important to every declaration, otherwise the pop-up's built-in styles will win.
- The input boxes draw their outline with box-shadow, not border. Style them with box-shadow: inset 0 0 0 1px [colour] and use :focus-within for the focused state.
- Only use fonts my store already loads. Don't add @import or font links.
- Keep all text readable against its background (WCAG AA contrast).
- Don't hide or restyle the "Powered by Giftnote" link.

Return one complete CSS block with short comments. After it, suggest a heading, intro line and save button label for the pop-up in my brand's voice.
Tips
Paste the whole CSS block every time you make a change, and keep a copy outside Shopify.
Check the result in a private browser window, because theme settings can be cached.
Change the pop-up wording in the Giftnote app (section 3), not with CSS.
For more detail, see Customising your gift message widget.
You switch app embeds on separately in each theme. If you set Giftnote up in an unpublished copy of your theme, check the embed is still on when you publish that copy.
3. Customize the popup in the Giftnote app
You change the widget's wording in Giftnote, not in the theme editor.
- In Giftnote, go to Settings → Gift Orders → Designs & widgets.
- Under Designs, click Edit on the design that's live (or click New design).
- Under Shows on, pick where the design is used: Theme, Checkout or Order status.
- Edit the wording on the Widget and Dialog tabs, then save.
The default delivery method, the recipient phone field and hiding the widget for B2B (company) customers apply to every design. Set them in Settings → Gift Orders → Settings: star the default delivery method, turn off SMS enabled to remove the phone field, or turn on Hide for B2B customers.
To turn delivery methods (Send Now, Send Later, On Delivery, On Fulfillment) on or off for the whole store, go to Settings → Gift Orders → Settings → Delivery methods. On Fulfillment, which sends the message when the order ships, is new in our September 2026 update.
Designs have no colour or font controls. Set colours, font and light or dark style in the theme editor under App embeds → Giftnote Control Panel → Style settings, or use its Modal Styling (CSS) field (see above).
The app embed also shows default delivery method, Hide "On Delivery" and Hide phone input settings. Giftnote uses the ones in Settings → Gift Orders → Settings instead, so change them in the app.
The logo, colours and fonts in your gift emails live separately, at Settings → Notifications → Email design.
4. Add the widget to the cart page
Using the theme editor
If your theme supports it:
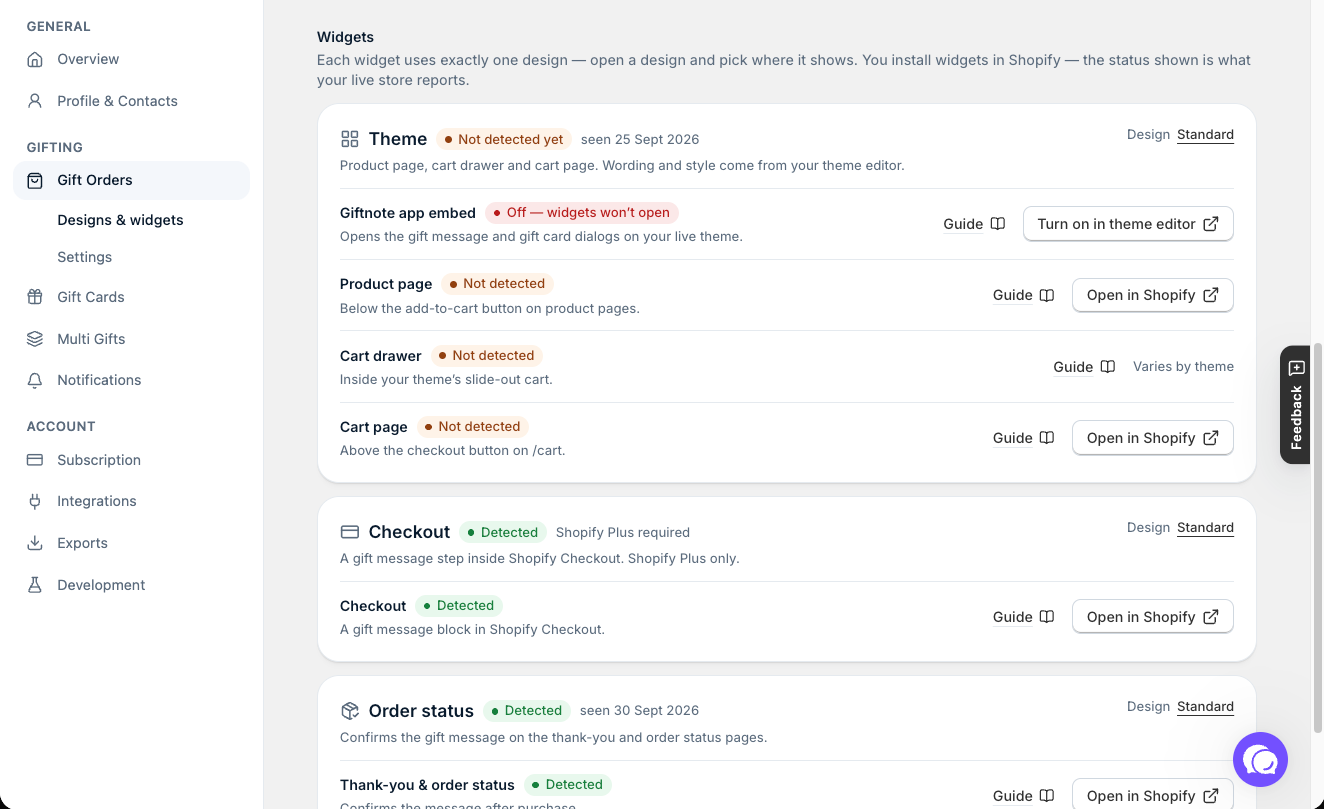
- Open your cart page in the theme editor. Or, in Giftnote, go to Settings → Gift Orders and click Open in Shopify next to Cart page.
- Add the Gift Order Message block the same way as on the product page, then click Save
Using a manual snippet
If your theme won't let you add blocks to the cart page, paste the same snippet into your cart template:
<template id="__NAME_OF_BUTTON__">
  <style> /* ADD CSS HERE */ </style>
</template>
<giftnote-button
  data-styles="__NAME_OF_BUTTON__"
  data-add="Add a gift message"
  data-edit="Edit gift message"
></giftnote-button>
For help, chat with us using the chat button in the help centre or in the app, or email support@giftnote.com, with your theme name and store URL.
5. Add to cart drawer
The cart drawer is the cart that slides out from the side. Most themes and cart apps (for example Rebuy) don't let you add a block there, so you paste a snippet instead. In Settings → Gift Orders, the Cart drawer row shows its status. It says Varies by theme instead of Open in Shopify, because each theme builds its cart drawer differently.
Paste this snippet into your cart-drawer.liquid file, or your theme's equivalent:
<template id="__NAME_OF_BUTTON__">
  <style> /* ADD CSS HERE */ </style>
</template>
<giftnote-button
  data-styles="__NAME_OF_BUTTON__"
  data-add="Add a gift message"
  data-edit="Edit gift message"
></giftnote-button>
For help finding the right spot, use the AI prompt in section 1 or chat with us using the chat button in the help centre or in the app, or email support@giftnote.com, with your theme name and store URL.
Using Rebuy Smart Cart? You set it up in Rebuy. Try Rebuy's own Giftnote module first. If that doesn't suit your cart, open your Rebuy admin, go to Smart Cart › Widgets, add a Custom HTML widget where you want it, paste the <giftnote-button> snippet above into it, then save and publish your Smart Cart. Rebuy integration covers both methods.
Troubleshooting
Is the widget installed?
In Giftnote, go to Settings → Overview. The Giftnote app embed card shows whether the Giftnote Control Panel app embed is on. If it's off, click Turn on in theme editor. Settings → Gift Orders lists each widget (Product page, Cart drawer, Cart page, Checkout, Thank-you & order status) as Detected or Not detected. These statuses only check your published theme, so changes in an unpublished copy show up once you publish it.
Widget missing, clashing with another app, looking wrong or not opening the pop-up?
Work through Widget Not Appearing on My Store. If that doesn't fix it, chat with us using the chat button in the help centre or in the app, or email support@giftnote.com, with your theme name and store URL.
Prefer us to add the widget for you? Email support@giftnote.com to request a complimentary onboarding.
Related articles
Was this helpful?
Still need help? Share an idea