1. Add the Multi-Gift Button to Your Shopify Store
Add the Multi Gift Redirect button to your product pages, cart or cart drawer (or paste a Liquid snippet on older themes), and check it's live from Giftnote settings.
Written By Giftnote Admin
Last updated 9 days ago
On the free plan or Core? Multi Gift needs the Professional plan. Choose a plan in Settings > Subscription in the app, or email support@giftnote.com and we'll help you choose. Which plan do I need?
The Multi Gift button takes shoppers from your Shopify store to your Multi Gift storefront, where they can send gifts to several people in one order instead of checking out once per gift. It suits corporate buyers placing bulk orders and shoppers sending gifts to friends and family. Multi Gift is on the Professional plan.
Before you start: set up your storefront first. See Set up Multi Gift.
Option 1: Add the Multi-Gift button via Theme Editor (Online Store 2.0)
- Open the theme editor from Giftnote. Go to Settings → Multi Gifts. In the Widgets card, find Product page (a “Send to multiple recipients” button under the add-to-cart button) and select Open in Shopify. Your Shopify theme editor (where you arrange your store's pages) opens on a product page.
- Add the block if it isn't there yet. Select Add block, search for "giftnote" and choose Multi Gift Redirect from the Apps tab.
- Drag it where you want it, for example under the Add to cart button.
- Select Save.
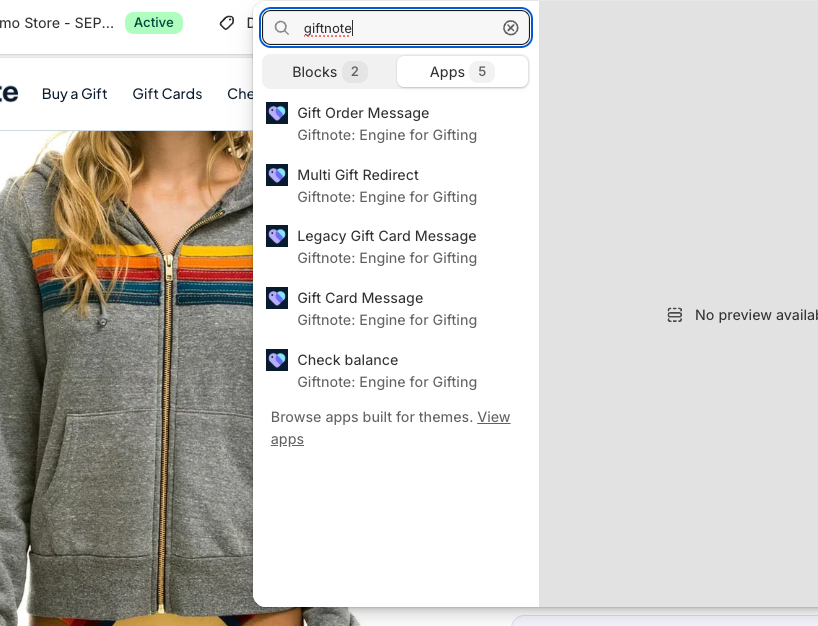
You can change the button's style in the theme editor.
Want to link to your storefront from somewhere else, such as a menu or an email? Select Copy link in the Widgets card to copy the Multi Gift Redirect link to your storefront.
What happens next?
- The button opens your Multi Gift storefront.
- Once your customer has added their gifts and recipients, they pay at your normal Shopify checkout.
Option 2: Add the button to cart page or cart drawer
You can also put the button on your cart page or in your cart drawer (the cart that slides out from the side).
- If your theme allows it, select Open in Shopify on the Cart page row of the Widgets card, then add the Multi Gift Redirect block to the cart section in the theme editor.
- If it doesn't, use the code snippet below.
Option 3: Manual snippet for non–Online Store 2.0 themes
Older themes (not Online Store 2.0) don't support app blocks. On those, paste this snippet into your theme's code where you want the button, for example in cart.liquid. Liquid is the code language Shopify themes use.
<giftnote-multigift
  data-shop="{{ shop.permanent_domain | replace: '.myshopify.com', '' }}"
  data-styles="giftnote-cart-multigift"
  data-label="SEND TO MULTIPLE ADDRESSES"
></giftnote-multigift>
Important: the snippet only works when the Giftnote Control Panel app embed is on. (An app embed is a switch in your theme editor that loads an app on every page.) In the theme editor, open App embeds, turn on Giftnote Control Panel and select Save. In Giftnote, the Widgets card shows its status as Giftnote app embed, with a Turn on in theme editor button.
Not sure which file or where? Paste this prompt into ChatGPT or Claude:
I want to add a "Send to multiple addresses" button to my Shopify store for Giftnote Multi Gift. My theme is [THEME NAME] and it doesn't support app blocks, so I need to paste a Liquid snippet into a theme file. I want the button [WHERE, e.g. "under the checkout button on the cart page" or "in the cart drawer"].

This is the snippet from Giftnote. Don't change it, apart from the data-label text if I ask:

<giftnote-multigift
  data-shop="{{ shop.permanent_domain | replace: '.myshopify.com', '' }}"
  data-styles="giftnote-cart-multigift"
  data-label="SEND TO MULTIPLE ADDRESSES"
></giftnote-multigift>

The Giftnote Control Panel app embed is already switched on in my theme editor (the snippet needs it).

Tell me:
1. Which theme file to open (for example cart.liquid, main-cart-footer.liquid or a cart drawer snippet) and how to find it in Online Store → Themes → Edit code.
2. Exactly where to paste the snippet, with a few lines of the surrounding code so I can find the spot.
3. How to check it works.

Don't change any other code. Tell me to duplicate my theme first as a backup. If you need to see my code, ask me to paste the file.
Duplicate your theme before editing code, and check the button in a private window afterwards.
Check the button is live
In Giftnote, go to Settings → Multi Gifts and find Product page and Cart page in the Widgets card. Each shows Not detected until the block is on your theme, then Detected. Each row has Guide and Open in Shopify buttons.
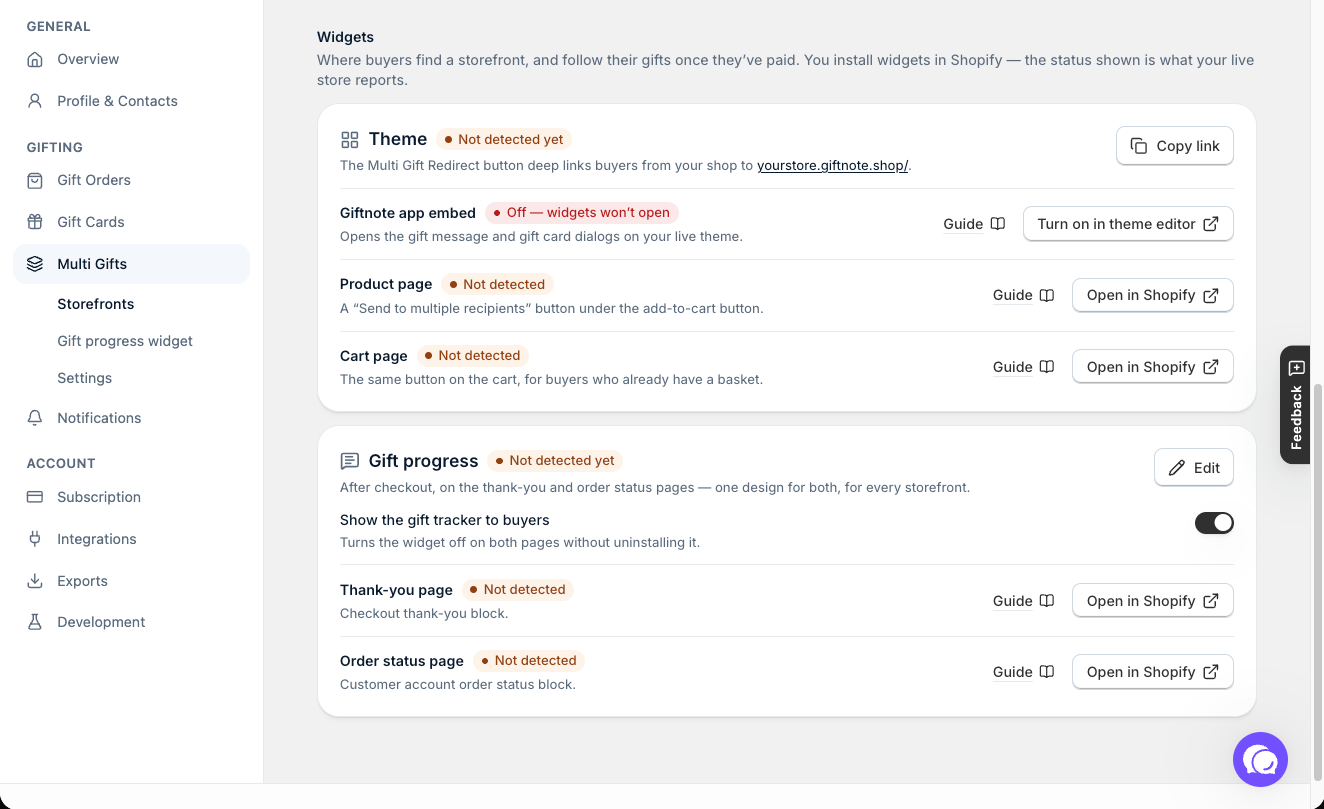
The status only checks your published theme. If you added the block to an unpublished theme, the status updates once you publish it.
Need help?
Not sure where to put the button or how to style it? Chat with us using the chat button in the help centre or in the app, or email support@giftnote.com.
Related articles
Was this helpful?
Still need help? Share an idea