1. Customising your gift message widget
How to customize the gift message widget's wording and CSS styling, including where each setting lives since the September update.
Written By Giftnote Team
Last updated 9 days ago
On the free plan? This feature needs the Core or Professional plan. Choose a plan in Settings > Subscription in the app, or email support@giftnote.com and we'll help you choose. Which plan do I need?
You can change what the gift message widget says, how it looks and where it appears, without editing your theme code. The wording lives in the Giftnote app. Colours, fonts and custom CSS live in your Shopify theme editor, in the Giftnote Control Panel app embed (the Giftnote switch and settings listed under App embeds).
Changing the wording
You can edit every piece of text in the widget: the title and description, the add and edit button labels, the pop-up title, the field labels and example text, and the delivery method labels.
- In the Giftnote app, go to Settings → Gift Orders → Designs & widgets.
- Click the design you want to change, or New design to make another (up to 10). The Widgets section shows which design is live on each surface.
- Edit the text on the Widget, Dialog · recipient, Dialog · message and Dialog · delivery tabs. Under Shows on, pick Theme, Checkout or Order status. The Preview shows your changes.
- Save if a save bar appears.
Change the wording here, not with CSS. Text you set in the design survives widget updates. Text you swap in with CSS breaks when the widget's markup changes.
The default copy is generic. A button written for your store, such as Add a handwritten-style note or Send this as a gift, tells shoppers what they get.
Not on Shopify Plus? You can't edit checkout, so use the design's text fields to set expectations about shipping and the recipient's contact details before the shopper gets there.
Changing colours and styling
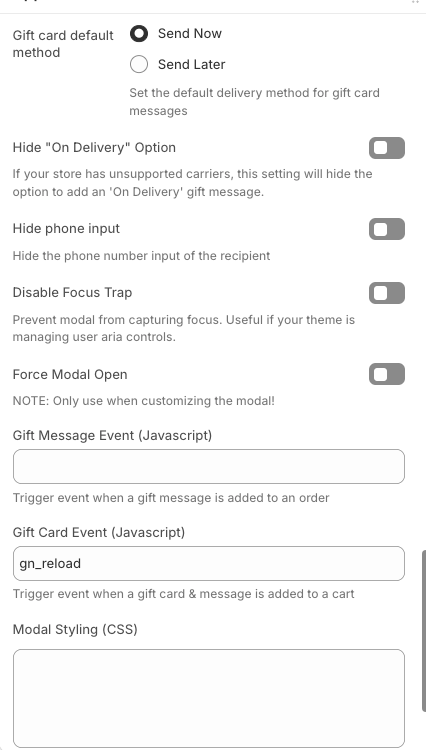
For colours and fonts, use the style settings in the app embed (see "Settings in your theme editor" below). For anything else, use the Modal Styling (CSS) field in the same app embed. CSS you paste there applies to the gift message pop-up only.
The pop-up's root element is #giftnote-modal. Start every selector from there.
A worked example
/* Match the modal to your brand */
#giftnote-modal {
  font-family: "Your Brand Font", -apple-system, sans-serif;
}

#giftnote-modal button[type="submit"] {
  background-color: #101219 !important;
  border-radius: 4px !important;
}
Let an AI assistant write the CSS for you
Copy this prompt into ChatGPT or Claude, fill in the bracketed parts, and paste what it returns into Modal Styling (CSS).
I sell on Shopify and use the Giftnote app. I want to restyle Giftnote's gift message
pop-up to match my brand. I'll paste your CSS into the "Modal Styling (CSS)" field on the
Giftnote Control Panel app embed in my Shopify theme editor.

My brand:
- Store URL: [your store URL] (if you can browse, look at my store for fonts and colours)
- Font: [font name, only one my store already loads]
- Button colour: [hex], button text colour: [hex]
- Corner style: [square / slightly rounded / rounded]

How the pop-up is built:
- Everything sits inside #giftnote-modal. The card is #content.
- Heading #giftnote-modal-title, intro text #giftnote-modal-description.
- Field boxes: #to-field, #from-field, #message-field, #email-field, #phone-field,
  #date-field, #time-field. Inputs are inside them.
- Delivery method tabs: #method button. The selected one has .active.
- Save button: #content #save-button. Close: #close-button.

Rules:
- Only use the IDs above. Don't target generated utility classes.
- Add !important to every declaration.
- If you draw a border on a field box, also set outline: none and box-shadow: none on
  the input inside it, or a blue box appears inside the field when it's selected.
- Keep text contrast at WCAG AA or better.
- Don't hide or restyle #powered (the "Powered by Giftnote" line).

Give me one complete CSS block I can paste in, with a short comment above each part.
Each time you change your CSS, paste the whole block into the field, replacing what's there. Keep a copy somewhere else, such as a note on your computer, so you always have the latest version.
Rules that will save you time
Add !important to every rule. The widget has its own styles, and without !important yours often lose.
Test in a private browser window. Your normal window may show an older copy of the page.
Check your CSS loaded. Open your store, view the page source and search for a line of your CSS. If you can't find it, the field didn't save. If it's there but has no effect, add !important or make the selector more specific.
Settings in your theme editor (Giftnote Control Panel)
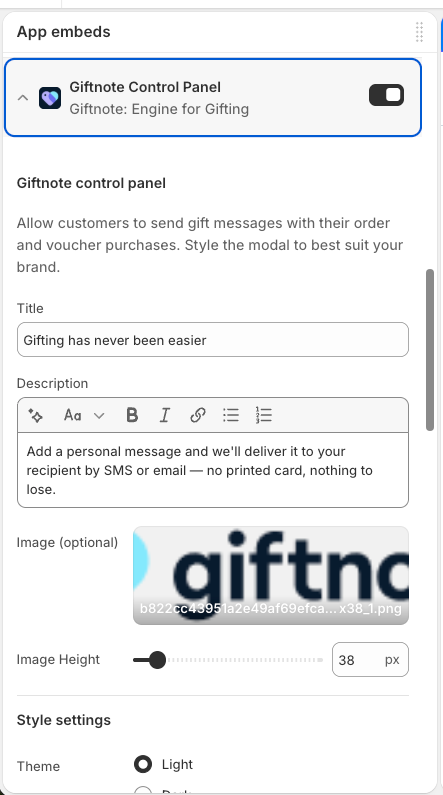
In Shopify, go to Online Store → Themes → Customize, open App embeds and expand Giftnote Control Panel. Its switch turns Giftnote on for the whole theme. If it's off, no gift message widget shows anywhere in your store.
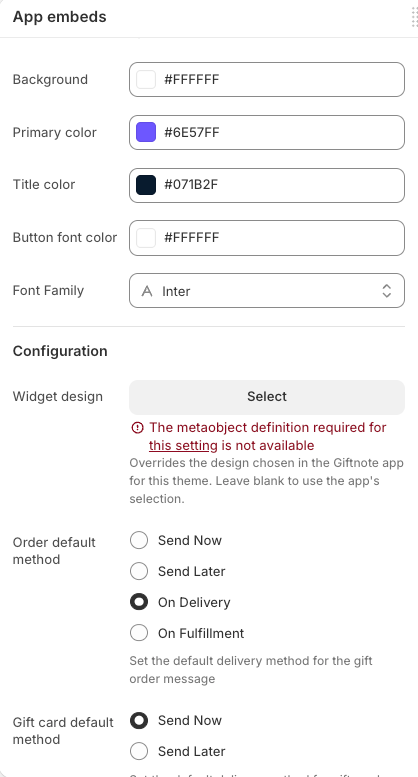
Seeing "The metaobject definition required for this setting is not available" under Widget design? Leave Widget design empty. Your widget uses the design from the Giftnote app, which is what most stores want. If you need a different design on one theme, email support@giftnote.com.
Developer options
Leave these alone unless a developer asked you to change them.
Can I remove the "Powered by Giftnote" branding?
- Checkout: no. Shopify controls checkout, so the branding stays.
- Pop-up widget and Multi Gift portal: no. The branding stays on every plan.
Not sure what applies to your store? Chat with us using the chat button in the help centre or in the app, or email support@giftnote.com, and tell us where you see the branding.
Changing where the widget appears
You choose where the widget appears in your theme editor, not with CSS. The usual spots are the product page and the cart page or cart drawer. On Shopify Plus you can also add it to checkout. See Add Gift Message Widget and Add Checkout & Post-Purchase Extensions.
If another app's widget clashes with Giftnote's on the product page, try moving Giftnote to the cart drawer. That usually fixes it faster than CSS.
Frequently asked questions
Will my CSS survive a Giftnote update?
Rules that start from #giftnote-modal and use the IDs listed in the AI prompt above keep working. Rules that target other class names can break when the widget updates, so check your styling after each Giftnote update.
Can I change the widget's layout, not just its look?
No. CSS restyles what's already there. To change the structure, a developer has to build a custom widget. See Custom Widget for Messages.
Can I style it differently on mobile?
Yes. Media queries work in the Modal Styling field.
Nothing I put in Modal Styling has any effect. What should I check?
Save the theme, test in a private window, and look for your CSS in the page source. If it isn't there, chat with us or email support@giftnote.com.
Can I hide the widget on certain products with CSS?
Use Hidden products instead. See How do I hide the gift message widget on specific products?
Related articles
Was this helpful?
Still need help? Share an idea