5. Add Checkout & Post-Purchase Extensions
Add Giftnote's gift message step to Shopify checkout (Shopify Plus) and the order status page (any plan), and set their options in the app.
Written By Giftnote Team
Last updated 14 days ago
These are two optional extras that catch shoppers who skipped the gift message widget on your product page or cart. The checkout extension adds a gift message step inside Shopify checkout (Shopify Plus stores only). The order status extension adds a gift message box to the order status (thank-you) page, on any Shopify plan. An extension is Shopify's name for an app block you add to checkout.
1. Giftnote checkout extension (Shopify Plus only)
Customers add their gift message on the checkout page itself, without leaving checkout.
1. Enable the Giftnote checkout widget
- In Shopify, go to Settings → Checkout and click Customize
- In the checkout editor, click Add block
- Under Giftnote: Engine for Gifting, choose Gift Message. Don't choose [DEPRECATED] Gift Message, which is an older block kept only for stores that already use it.
![Shopify checkout editor: Add block list open, with the Giftnote: Engine for Gifting group showing [DEPRECATED] Gift Message and Gift Message](https://689448d2a73fbf3cb036edde.featurebase-attachments.com/c/article/68ee8c18b7938b12cbe2465a/01a0da2b-0e3a-7694-8b4a-21702d0c21f9/b64u-MDFhMGRhMmItMGRlNC03MTNkLTk4ZGEtNDA3ZjA0NzVjYTVi.png?X-Amz-Expires=3600&X-Amz-Date=20261016T000000Z&X-Amz-Algorithm=AWS4-HMAC-SHA256&X-Amz-Credential=DO801TYC4FCVNNEKURKM%2F20261016%2Ffra1%2Fs3%2Faws4_request&X-Amz-SignedHeaders=host&X-Amz-Signature=0b1f9b2c2563d51dc26e0a9c1e5102ae9a45429d51ea97a48591f681671cb53b)
- Click Enable block
- If your customers use Shop Pay, select the Gift Message block and, under Checkout behavior, turn on Include block in Shop Pay. Then run a test checkout with Shop Pay and check the gift message option appears.
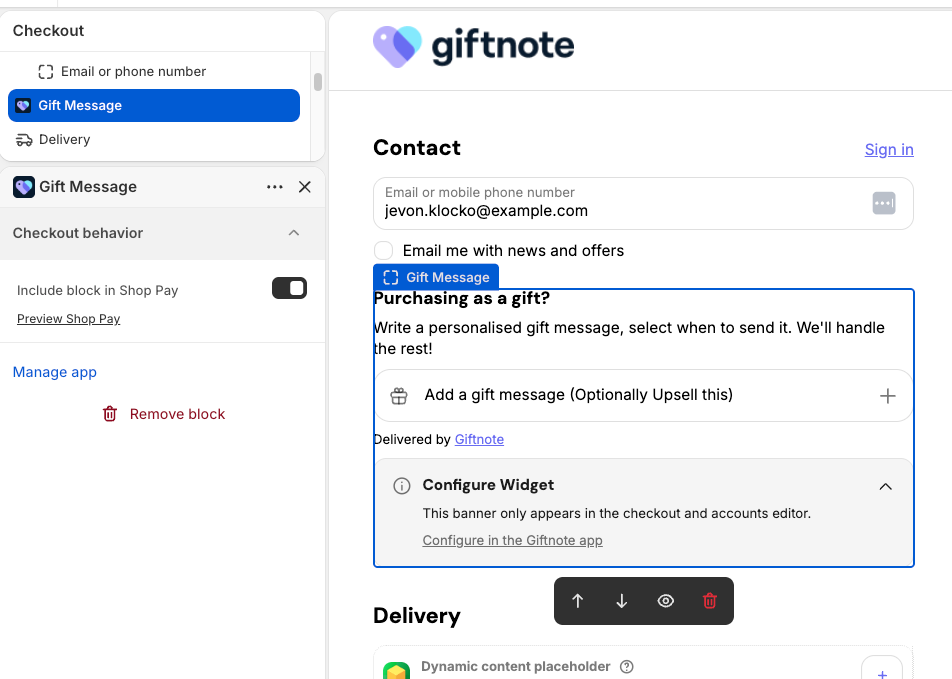
You can drag the block anywhere on the checkout page. In the checkout editor it only has Shopify's Checkout behavior options. You set everything else in the Giftnote app.
2. Customize widget settings (in the Giftnote app)
The wording and delivery options for the checkout step come from a design (a saved set of widget wording and options):
- In Giftnote, go to Settings → Gift Orders → Designs & widgets.
- Under Designs, click Edit on the design used for Checkout (or create one with New design). Under Shows on, check Checkout is selected.
- Edit the wording on the Widget and Dialog tabs, then save.
Some settings apply to your whole store whichever design is live. Find them under Settings → Gift Orders → Settings:
- Delivery methods: turn Send Now, Send Later, On Delivery and On Fulfillment (new in our September 2026 update) on or off, and star the default
- Gift message form: SMS enabled (off removes the phone field) and Hide for B2B customers
- Hidden products: products where the gift message option won't show on the product page
- Where the gift message shows: hide the gift message box in some countries or Shopify markets, or show it only in some, at checkout and on the order status page
- The surcharge product, if you charge for gift messages (section 3)
3. Optional: charge for gift messages
To charge a fee for a gift message:
- Create a digital product in Shopify, for example "Digital Gift Message", priced at your fee.
- In Giftnote, go to Settings → Gift Orders → Settings and select that product's variant in the Surcharge & visibility card. Save if a save bar appears.
When a customer adds a gift message at checkout, the Gift Message block adds the fee to the order as a separate line. If they remove the message, the line goes too. You can use the same product to sell gift wrapping or another extra, with the gift message included.
Upselling and Charging for Giftnote at Checkout on Shopify Plus has the full setup.
4. Troubleshooting
- Not showing in checkout? Check you're on Shopify Plus and that you added Gift Message, not [DEPRECATED] Gift Message.
- Need to hide it for some products? Use Hidden products under Settings → Gift Orders → Settings. It hides the option on the product page, so test your checkout as well.
Notes
- Needs Shopify's current checkout (Checkout Extensibility)
- Doesn't work with Shopify's older checkout or with third-party gift card products
2. Enable gift messages on the order status page (all Shopify plans)
This adds a gift message box to the order status (thank-you) page, so customers can add or edit a gift message after they've paid. It works on every Shopify plan.
Step 1: Add the Giftnote widget to the order status page
- In Shopify, go to Settings → Checkout and click Customize. (Or, in Giftnote, go to Settings → Gift Orders and click Open in Shopify next to Thank-you & order status.)
- Switch the page selector at the top to Order Status Page
- Click Add App Block, then select Gift Message
- Drag the block where you want it and click Save
Customers can now add a gift message if they didn't earlier, or edit their message before it's sent, from the order status page.
Step 2: Configure widget settings in Giftnote
- In Giftnote, go to Settings → Gift Orders → Designs & widgets.
- Under Designs, click Edit on the design used for Order status.
- Edit the widget's wording and labels, then save.
Refresh the checkout editor in Shopify to see your changes. The default delivery method, SMS enabled, Hidden products and Where the gift message shows are under Settings → Gift Orders → Settings.
Step 3: Add a link to the Shopify order confirmation email
Add a link to your Shopify order emails so customers can add or change their gift message later.
- Open your Shopify notifications. In Shopify, go to Settings → Notifications.
- Edit the email. Open the Order confirmation template, the Shipping confirmation template, or both.
- Paste the snippet below where you want the link to appear, then save.
{% comment %} Gift Message Email Block for Shopify Order Confirmation Emails {% endcomment %}
<br>
{% assign giftnote_attribute_count = 0 %}
{% for attribute in order.attributes %}
  {% if attribute.first contains 'giftnote_' %}
    {% increment giftnote_attribute_count %}
  {% endif %}
{% endfor %}
<h4 style="margin-top: 20px;">
  {% if giftnote_attribute_count > 1 %}
    Your gift purchase 🎁
  {% else %}
    Purchasing as a gift? 🎁
  {% endif %}
</h4>
<a href="{{ order.order_status_url }}">
  {% if giftnote_attribute_count > 1 %}
    View and edit your gift message
  {% else %}
    Add a gift message to your order
  {% endif %}
</a>
{% comment %} Gift Message Email Block for Shopify Order Confirmation Emails {% endcomment %}
You can change the wording and add your own styling.
The snippet checks the order's giftnote_* order attributes to decide which text to show. Giftnote only writes those attributes while Also save as order attributes (legacy) is on, under Settings → Gift Orders → Settings → Orders. If it's off in your store, chat with us first: once it's off, only our support team can turn it back on.
For help, chat with us using the chat button in the help centre or in the app. Or email support@giftnote.com to request a complimentary onboarding, and we'll set up these blocks for you.
Metafields vs order attributes
You only need this if a developer, packing slip app or other tool reads gift messages from your orders.
Giftnote saves each gift message in a Shopify metafield (a custom data field on the order) called giftnote.gift_message. That's the value Giftnote itself uses, and the one to point Klaviyo, Shopify Flow and other apps at. Custom themes can still send the message to Giftnote as giftnote_* cart attributes (see Custom Widget for Messages).
If your theme, packing slips, Shopify Flow, Order Printer or 3PL read the older giftnote_* note attributes, you need Also save as order attributes (legacy) (Settings → Gift Orders → Settings → Orders) on, so Giftnote writes those too. The app marks this setting as being phased out. Stores that had it on before the September 2026 update keep it on. Once it's off, only our support team can turn it back on.
Use cases for order status gifting
- A customer forgot to add a gift message at checkout
- A customer decides after paying that the order is a gift
Related articles
Was this helpful?
Still need help? Share an idea